
Converting a cupboard into a wine cellar using CellarSmart.com.au modular wine racking units is a practical and efficient way to create a dedicated storage space for your wine collection. Here are the steps to follow:
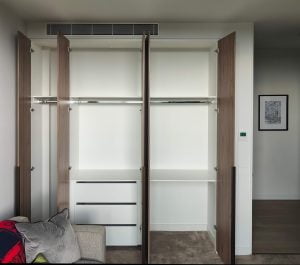
Evaluate the Cupboard: Assess the cupboard to ensure it is suitable for conversion. Consider the dimensions, location, and ventilation options. Verify that the cupboard is structurally sound and can support the weight of the wine and wine racking units.
Measure and Plan: Measure the dimensions of the cupboard to determine the number and size of modular wine racking units required. Take into account the depth, width, and height of the cupboard, as well as any specific bottle capacity requirements.
Using the Cellar Smart Design Room fill your space with virtual Modular Units. Choose the units that best fit your space and meet your storage needs. Consider factors such as bottle size compatibility, design options, and customization possibilities.
Prepare the Cupboard: Empty the cupboard and clean the space thoroughly. Remove any shelves or fixtures that are not needed for the wine cellar conversion. Ensure the cupboard is free from dust, debris, and odours.
Consider Ventilation: Proper ventilation is advantageous for maintaining the ideal storage conditions for wine. Assess the existing ventilation in the cupboard and make any necessary modifications. If additional ventilation is required, consult with a professional to install a ventilation system that ensures proper airflow.
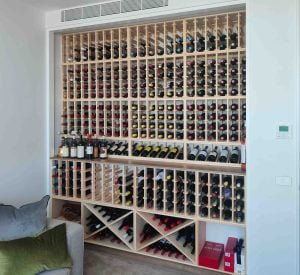
Assemble the Modular Units: Follow the assembly instructions provided by CellarSmart.com.au to put together the modular wine racking units. These units feature easy-to-assemble components that can be joined securely. Assemble the units according to your desired layout, taking into consideration the available space and bottle capacity.
Secure the Units: Once the modular units are assembled, ensure they are securely attached to the walls or floor of the cupboard. This will provide stability and prevent any movement or accidents.
Arrange the Wine Racks: Begin arranging the wine racks within the cupboard based on your preferred layout and organization system. Consider factors such as bottle orientation, accessibility, and aesthetics. Leave enough space between the racks for easy bottle retrieval and to accommodate any additional features you may want to include, such as lighting or a tasting area or benchtop.
Organize the Wine: Start placing your wine bottles onto the modular wine racking units. Arrange them according to your desired organization method, such as by varietal, region, or vintage. Ensure that the bottle with corks are stored horizontally to keep the corks moist and maintain wine quality.
Label and Document: Label the wine racks or utilize a digital wine inventory system to track your collection effectively. This will make it easier to locate specific bottles and manage your wine cellar inventory.
Monitor and Maintain: Regularly monitor the temperature levels within the converted wine cellar. Use a thermometer and hygrometer to ensure they remain within the optimal range for wine storage.
Enjoy Your Wine Cellar: Once the conversion is complete, take pleasure in your newly transformed cupboard wine cellar. Admire your wine collection, share it with guests, and savour the convenience and accessibility of having a dedicated wine storage space.
Remember to consult Cellar Smart for any specific instructions or guidelines related to their modular wine racking units. Additionally, seek professional advice if you have any concerns about the conversion process or if you require assistance with ventilation or other technical aspects.